[Review] eZn Real Milk Hair Colour Pastel Purple [리뷰] 리얼 밀크 헤어컬러 파스텔 퍼플

Thursday, May 25, 2017

Hi, dreamers! I'm back with a review of another purple hair dye. I previously tried and loved the eZn Shaking Pudding Hair Color in Smoky Lavender which gave me a really pretty result but it unfortunately only lasted a couple of washes before it faded. This time, I'm trying the eZn Real Milk Hair Colour in Pastel Purple. Like the Shaking pudding hair dye, this dye comes in a lot of natural colors as well as a decent selection of vivid and pastel colors. The packaging is super cute too! Even the bottle and tube look really cute and fit the milk theme really well.


Based on the color chart at the side of the box, this hair dye will supposedly dye both virgin hair and bleached hair to a quite strong purple color. Most hair dyes that I've tried usually only stick to either my bleached hair or my roots - it never gets dyed equally. So I'm pretty excited that this hair color seems to dye both bleached/dyed hair and un-dyed hair.


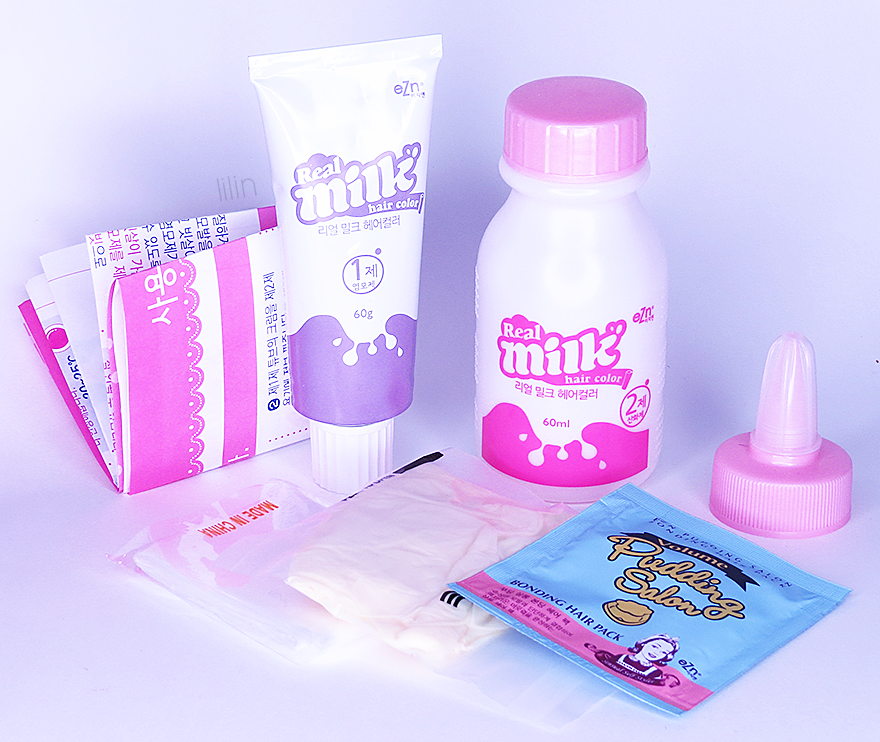
This dye includes 1 tube of color cream, 1 bottle of dyeing agent, 1 plastic 'gown' to cover yourself and your clothes, 1 pair of gloves, a bonding hair pack, and of course, instructions. The instructions are really easy to follow even if you can't read korean, because of the clear and simple illustrations for each step. In any case, I'll explain the dyeing process briefly anyway.

First of all, be careful not to get any of the hair dye on your floor or furniture, because it will most likely stain. Prepare by covering your clothes with the plastic gown and put on your gloves. Make sure your hair is dry before starting the application.

Tip! The best time to dye your hair is when it's dirty/oily. If you wash your hair right before dyeing it, you're removing the natural oils from you hair which protects it, and by removing all the natural oils your hair will also become squeaky clean and 'slippery' which means that the hair dye won't stick to your hair as well as on dirty hair. However, be sure that you don't have any hair products in your hair, such as serum, leave-in conditioner, hair spray etc. If you do, just wash your hair and wait a few days before dyeing. But, if you really can't wait to dye your hair, just brush your hair thoroughly to remove any excess hair product.  

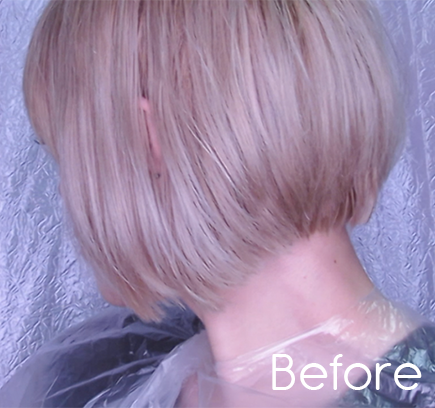
When I was all set, I started applying the hair dye at the back of my head and worked my way up as the instructions suggested. After covering my roots I started applying it to the rest of my hair and then combed it through carefully. I let it sit for a little more than 30 minutes. I then rinsed it thoroughly with lukewarm water and applied the conditioner which I let sit for about 5 minutes before I rinsed everything out. Here is the result!


Here's the video of me dyeing my hair with this hair dye, where you can see the before and after more clearly.


Unfortunately, yet again it didn't dye the ends of my hair into a purple color, but rather a (really pretty) grey color. I guess the ends of my hair are just totally messed up, haha. However, the result is really gorgeous! I basically now have deep purple roots and grey ends. The result it gave me is actually quite similar to the eZn Shaking Pudding Hair Color in Smoky Lavender, except that this dye gives a more strong and deep purple color. I will definitely keep using this color. The only reason I choose this one over the Pudding Hair Dye is that it gives a stronger color which means that it'll probably last a bit longer.

In any case, I actually really like the ombre look I ended up with, but I might try to touch up my ends with my Directions Hair dye in Violet which usually only sticks to my bleached hair and not my roots. We will see! In any case I will make an update about the result on here.

Thank you so much for reading. Let me know what you think! Bye for now, dreamers~


Caramel Macchiato ♡ Eye Makeup

Sunday, May 21, 2017

Hello, dreamers! I'm back with yet another video on my Youtube Channel! Crazy, right? I can't believe that I've actually been uploading videos kind of regularly. My goal is to upload 1-2 videos every single week! Let's see if I can keep it up, hah. Check out the video below and let me know what you think! (I kind of messed up the eyeliner at the end, whoops! Everyone makes mistakes~)


Anyway, I'm sorry for not posting any actual blog posts here on my blog. I'm actually working on a bunch of blog posts, but as you can see, I've been focusing on my Youtube Channel these days. I hope you understand! I'm still kind of new to making videos, so it really takes up a lot of my time and energy. In any case, I'll try to start managing both my blog and my Youtube Channel at the same time, as soon possible!

Thank you so much for reading/watching. Bye for now, dreamers ♡

Makeup for Rainy Days

Wednesday, May 17, 2017

Hello, dreamers! I'm back with yet another makeup tutorial which is now live on my Youtube Channel at youtube.com/lilinTV

It was raining the other day here in Seoul and I was suddenly really inspired to do a Makeup Tutorial to go with the grey and gloomy mood. I  love rainy days so I really enjoyed creating and filming this look. Please like the video and subscribe to my Youtube channel for more videos like this. Your support means everything to me.

Thank you so much for watching and bye for now, dreamers~

Golden Rose Makeup Tutorial

Sunday, May 14, 2017

Hello, dreamers! I uploaded a new video on my channel. Check it out below or head over to youtube.com/lilintv. If you would like to see more videos on my channel in the future, especially more frequently, please subscribe to my channel and like this vide. Your support would mean a lot!


Thank you so much for watching! See you next time!

Studying Korean at an Academy

Saturday, May 13, 2017

Hello, dreamers! I'm really sorry for the lack of posts lately, but I have my reasons. First of all, my ring light broke (again), and I finally got a new one so I can start taking pictures and create posts and videos again. I can't wait!

Second of all, I've started to study Korean at an Korean Language Academy in Seoul. The Academy's name is literally just Seoul Korean Language Academy and they have 2 campuses, 1 in Gangnam, which is the one I go to, and 1 in Jongno. I've been living in Korea for almost 2 years now and I can't believe that I haven't studied korean at an academy up until now.


When choosing a school, I simply made a search on Google and that particular Academy was one of the many results I found.  The reason I chose this academy was simply because it looked really nice and the price was more reasonable compared to other schools. The staff and teachers are also really nice! I went to the school to register in person and take my level test right on the spot. I got into class 1C which is a bit above beginner level. I'm really happy with the level I got because at this point I can understand everything that is said in Korean but I still learn a lot of new things. Like I said, I understand Korean well, but my weak points are speaking and grammar (actually building sentences etc.), which is something we are focusing on right now, so this class is perfect for me. The books we are using right now are in the picture on the left!

My class is really small (3-4 people), but I don't mind at all. I actually think it's nice to be in a small class since the teacher can help us out more with our questions and focus on the things we need to learn as individuals.

After my first class, I felt that I really needed a notebook and some markers, so I went ahead and got myself this super cute Korilakkuma notebook at Dream Depot. The pencil case is from H&M and the pens are from Artbox. I love them!

In any case, I'm studying really hard right now, but I will definitely start blogging and making videos again. So stay tuned here on my blog and my Youtube channel! I'm also focusing on updating my Instagram more frequently. My last picture was a throwback selfie after my first day of school, so make sure to check that out as well.

Thank you so much for reading! Bye for now~

[Review] eZn Shaking Pudding Hair Color Smoky Ash Lavender 쉐이킹 푸딩 헤어커러 스모키애쉬라벤더

Thursday, May 4, 2017

Hello, dreamers~ It was time to dye my hair again, so as always, I went to Olive Young to choose a color. I decided to pick up the eZn Shaking Pudding Hair Color Smoky Ash Lavender, which is a hair color I've actually been wanting to try for a really long time, especially because it looks so cute! This is what it looks like.


After dyeing my hair gold/orange a few months earlier, my hair had faded to a pale yellow/greenish blonde with orange roots. I don't know exactly what's wrong with my hair, but half of my hair barely picks up any color and any hair dye I use fades extremely fast on the ends of my hair. It has been like this ever since I first started dyeing my hair a long time ago, no matter how much It gets cut and regrows. Anyway, I obviously hoped for a lavender color, but since my hair is so bad at picking up any hair dye, I was at least hoping to achieve a decent ash color, hopefully with some pretty lavender undertones (because purple cancels out yellow).


First of all, let's take a look what's inside the package. The box contains the pudding hair dye including 2 dyeing agents. It also comes with an after treatment, instructions, gloves, plastic ear covers and a shoulder cover. Basically everything you need.


Thanks to the pictures, the directions are very easy to follow even if you don't understand Korean.


From now on, there won't be many pictures since I had my hands full while dyeing my hair, but I'll try to explain through the process of dyeing my hair with this dye as best as I can. Here we go~

[Dyeing Process]  First of all, I put on all of my protections gear and poured the liquid from the 2 bottles into the container. You're supposed to hold the container upright and shake it from side to side. After shaking it for a few seconds, the liquid inside had turned into a pudding-like consistency which I've never seen in a hair dye before. I thought it was pretty cool, haha. I kind of regret that I didn't go out of my way to take a picture.

Now that the dye was mixed properly, I just started applying straight to my hair as you would do with any hair dye. The hair dye started developing and turning into a really bright purple immediately after applying it. After just a few minutes my hair was a very deep purple. This kind of freaked me out at first because I've had previous experiences with ash hair dyes that turn into a much darker color than I expected them to. However, I let it sit for the recommended 30 minutes anyway and washed it out as usual.

[Result] After drying my hair I was so happy to see that my hair was now a beautiful grey color with lavender roots and highlights. I was really surprised that my roots actually turned out lavender because hair dyes in this kind of color usually don't cover my darker orange (but previously bleached) roots that well.

The stubborn and damaged ends of my hair didn't pick up as much color as my healthy hair close to my roots, but it had still changed into a really pretty ash color which is the best result I've had in a while.

Here's a before and after so you can tell the difference and see the result more clearly.

     
This is the best Korean hair dye I have tried so far because it finally gave me a color that I absolutely love.

[Lasting Time] The only downside with his hair dye is that it fades very quickly. The color started fading after just 1 wash but it still looked nice. After 2-3 washes it still looked nice but it had faded to a pale silver. After 3-4 washes there was no lavender left at all andNow, after 1 month my hair is only a pearly silver on the roots and my ends have gone back to yellow, but it's not as orange/yellow as it was before I dyed it. If your hair is healthier and picks up color easier than mine, this hair dye will definitely give you the smoky lavender color all over you hair, instead of just close to the roots like me. So it might last longer for those with healthy hair unlike mine.

[Would I repurchase?] Like I said before, I got this hair dye at Olive Young, where they sell it for 14,500 (KRW) but I got it on sale for only 7000! At the original price it's already quite cheap, so even if the dye doesn't last that long I will definitely repurchase this hair dye again because of how much I love the result.

That's it for this post! Thank you so much for reading and bye for now, lovelies~