[Review] PrincessPinky Cloudy Blue (on Green Eyes)

Thursday, April 26, 2018

Hello, dreamers! I'm back with another review of a pair of lenses from PinkyParadise. This time I'm doing a review of the Princess Pinky Lenses in Cloudy Blue. I've done a review of the Princess Pinky lenses in Cloudy Green in the past so click here to check it out.


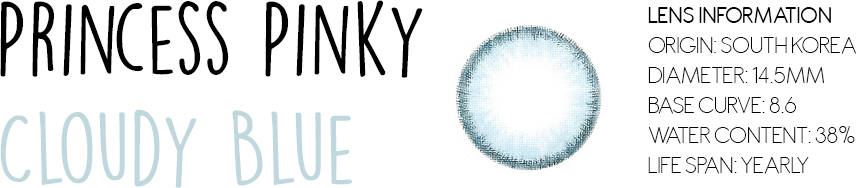
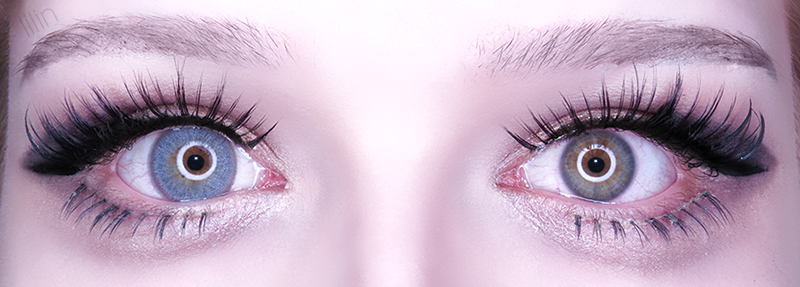
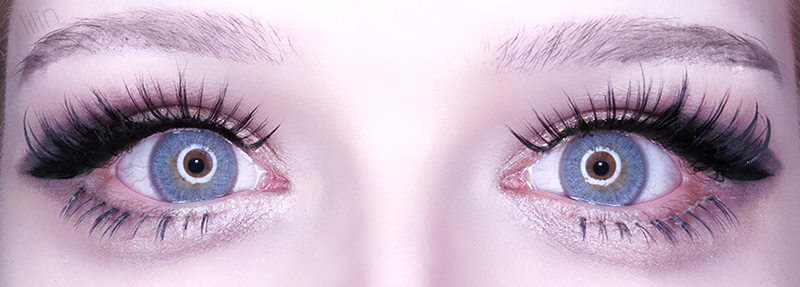
Color & Design: The color is a beautiful pale and icy blue which is similar to the shade people with naturally blue eyes have. The limbal ring is a soft darker blue color. The color is quite opaque but looks soft because of the cloudy pattern which I really like because it makes them look natural compared to other lenses. Although they don't cover the iris completely they blend in very well with the natural eye color so I think these lenses will look good on any eye color. However, I think they will suit light eyes, like blue and green, for the color to show up more and will give a more natural feel.

Enlargement & Comfort: The diameter is 14.5mm and I think it gives me just the right amount of enlargement. Most light-colored lenses I've tried are quite small or don't really give a big enlarging effect even if the diameter is on the large side. In any case, I think the size and enlarging effect of these lenses is perfect. They are also very comfortable. These days I've gotten quite a lot of headaches which usually get worse if my eyes get tired and dry because of wearing lenses, but these lenses have worked really great for me! I can't feel any discomfort or side-effects at all when I'm wearing them.


Overall: The Cloudy Green lenses are my favourite lenses ever when I want a natural look and the Cloudy Blue share first place with them because they also look natural but give my eyes a different vibe. I think the Cloudy Green lenses give my eyes a charming and cute look, while the Cloudy Blue lenses give off a more cool and mysterious vibe.

To sum things up, the reason why I like these lenses so much is that they are a light color with a soft limbal ring but they're opaque and change the color of my eyes completely. On top of that they are quite big and give a very nice enlarging effect, all the while still looking very natural. Everything about these lenses is just perfect!

At last but not least, here's a super blurry selfie (taken with my phone).
I dyed my hair blue, by the way (duh)! I did a review and a video of this hair dye. Click here to check it out!

That sums up my review of the Princess Pinky Lenses in Cloudy Blue. Click here to check out the review I made of these lenses in Cloudy Green and don't forget to visit PinkyParadise to browse through lots of other Circle Lenses.

Thank you so much for checking out this post, I hope you enjoyed it. Bye for now, dreamers!

[Review] eZn Real Milk Hair Color Pastel Blue [리뷰] 이지엔 리얼 밀크 헤어컬러 파스텔 블루

Tuesday, April 24, 2018

Hello, dreamers ♡ In this post I'll be doing another review of the eZn Real Milk Hair Color. I've previously tried this hair dye in both Pastel Purple and Pastel Brown and I really liked them both, so I'm very excited to try it in another color. This time I'm trying out the one in Pastel Blue. Let's check it out!


First of all I just have to say that the packaging is so cute which was what initially made me want to try these hair dyes.

INCLUDES
 Hair Dye (1 Bottle, 1 Cream)
 Plastic Gloves
 Plastic Gown
• Instructions
• Conditioner

APPLICATION
The application from start to finish is comfortable and easy. It's great that it includes a pair of gloves in addition to a plastic gown to cover my clothes. I have quite short hair which only reaches to my chin, but a full bottle barely managed to cover all of my hair completely. So if you have longer hair than me, I recommend you to get more than one box if you want to get an even and full coverage.

RESULT
The hair dyes of this series always come out very pretty and this one is no exception. My hair was quite yellowish to begin with (a lot more than it shows in the picture) so I was a bit worried that it might turn out greenish which is something I really didn't want. But to my surprise, my hair turned into to a beautiful and vibrant pastel blue color after using this hair dye. It covered even the overly bleached and damaged tips of my hair very well which most toners and hair dyes can't do because it just won't stick to my hair. In any case, I'm very happy with how it turned out.


LASTING POWER
From my previous experience, this hair dye starts to fade already after the first wash and disappears almost completely after about 2 weeks depending on how many times I wash my hair. In my opinion this is actually quite nice because it gives me the chance to try out and experiment with different hair colors without having to commit to that particular color for a long time. This is especially true in this case because I already know that I won't be wanting to keep my hair blue for a long time - I just wanted to try something new temporarily.

OTHER
Although the color covered my hair well and turned my hair to a vibrant and beautiful pastel blue, it almost didn't dye my fresh regrowth at all, only turning it into a cool ash color instead of the natural dark blonde color I had there. So, this hair dye is definitely only suited for bleached (or naturally light blonde) hair if you want to get a result that is close to what is shown on the box.

Check out this video if you want to see me in the process of trying out this hair dye.


Thank you so much for reading and watching. I hope you enjoyed and be sure to let me know what you think in the comments. Bye for now, dreamers ♡

Etude House Wonder Fun Park Candy Cheek Brush, Candy Highlighter Brush & Color Eyeshadow Brush [Review] - 에뛰드 하우스 캔디 치크 브러쉬, 컬러 아이즈 섀도우 브러쉬, 캔디 하이라이터 브러쉬 [리뷰]

Wednesday, March 14, 2018

Hello, lovelies! Etude House launched their latest line called "Wonder Fun Park" quite a while ago now but I really wanted to do a review on their brushes from this line anyway. This line is one of their best concepts yet in my opinion so I obviously had to pick up some of the products from the Wonder Fun Park Collection right away. The first things that caught my eye from this line were these gorgeous Makeup brushes which I immediately just had to have. Before heading to Etude House to check out the Wonder Fun Park line, I was actually about to order a set of Unicorn brushes which these brushes reminded me a lot of because of the colourful bristles.

Anyway, let's take a closer look at these brushes!

First of all I have to say that I love the packaging. The packaging is actually very simple and basic, but the glitter background and the pastel-colored label just makes the whole thing look so beautiful and bright.

My favourite thing about these brushes is obviously the pastel coloured bristles, but I also like the simplistic white handles with the pink Etude House logo which ties in really well with the colors of the bristles. The overall look of the brushes is beautiful and unique, but at the same time it looks very clean and put together. 


Candy Cheek Brush (left picture) - A big and slanted blush brush. It could definitely be used for contouring too but so far I've only tried it for applying my blush. It's quite dense but soft at the same time which in my opinion picks up just the right amount of pigment to build up a nice color. 

Candy Highlighter Brush (right picture) - A big and whispy brush with a flat and rounded top, which is meant to be used to apply highlighter. This is probably the brush that I've used the least out of these  brushes. Mainly because I don't use powder highlighter that much, and secondly because I find it hard to control where the highlighter goes with this type of brush. 

       
Color Eyeshadow Brush - This is a dual eyeshadow brush with a medium-sized base shadow brush on one end (left picture) and a smaller, more flat detail brush on the other end (right picture)

I reviewed some of Etude House's makeup brushes in the past but I have to say that these are definitely their prettiest brushes yet. I honestly didn't even want to use them at first but I tried them out and since then I've used them almost every time I do my makeup because they're really useful. 

What do you think about these makeup brushes? Let me know what you think in the comments. Thank you so much for reading. Bye for now, lovelies~

Glitter Freckles Makeup

Sunday, March 11, 2018

Hello, lovelies! I tried a makeup look that I wanted to try for a really long time - Glitter Freckles! I've never tried anything like this before so I was a little worried about the outcome, but I'm really happy with how it turned out. It's probably one of my favourite makeup looks I've done so far!

To achieve this look I started off with putting some blush in a straight line across my nose and under my eyes. For the glitter freckles I used 3 types of nail glitter which I got at Daiso. I mixed heart-shaped glitter and two different sizes of regular round glitter which I attached with some eyelash glue and Q-tips. It's super easy! I really want to try out some more variations with other colors of blush and glitters next time.


Would you like to see a tutorial for this look? Let me know in the comments! Thank you so much for reading. Bye for now, lovelies~

Fanfanduck Makeup ♡ 빵빵덕 메이크업

Friday, March 9, 2018

Hello, lovelies! As you know I'm a huge fan of Chuu and they did a collaboration with Fanfanduck a little while ago. I think the character is super adorable and wanted to do a look inspired it ever since the collaboration collection came out. This look was actually also requested so I'm really excited that I finally got around to do it. Check out the video below to see my makeup inspired by this super cute character.


Thank you so much for watching. Bye for now, lovelies!